Table of Contents
Introduction
Are you curious about discovering how long you can screen record on iPhone? It completely depends on the iPhone model you are using.
However, you can screen record on an iPhone continuously as long as the device has battery life and free space.
Screen recording on the iPhone is such a useful feature for several reasons: it allows one to save conversations, tutorials, and much more.
But screen recording quickly fills up the hard drive and slows down the performance of the device.
Therefore, managing your device’s free space is very essential if you need a longer screen recording.
Step-By-Step Guide on Screen Record on iPhone!
It is incredibly easy to record a screen on an iPhone. When you want to record a screen, just follow these steps:
On iPhone X and later models
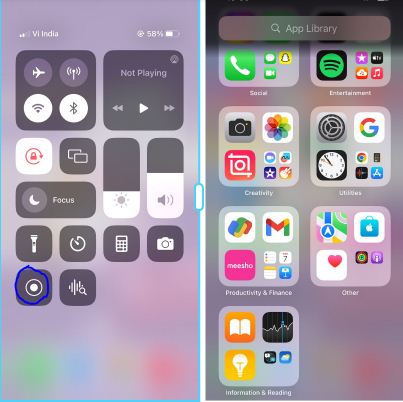
- Open the control center by sliding down from the top-right corner. For earlier generations, you need to swipe up from the bottom to open the control center.
- Check the icon shapes, like a circle with a dot present in it. This is the icon dedicated to screen recording.
- Wait for the countdown of three seconds, and the recording will start after this.
- When recording it, click on the red status bar present at the screen top and then click on “Stop” to confirm.
Step-By-Step Guide On Screen Recording On iPhone With Sound
It is as easy to record with sound as without sound, as discussed earlier. If you don’t change the settings, your iPhone will remember these settings and will always keep them. Let’s start:
- Access the control center by swiping down from the top-right corner. Then tap and hold the screen recording button.
- Here, you will find some additional screen recording options. Even you can share your screen during video conversations with the right apps. At the bottom of the phone, see if there is a “Microphone” button present on it. When you turn on the button, audio will be recorded from both you and your surroundings.
- Now to record the screen naturally, ensure ‘Photos’ is chosen, and then click on the “Start Recording” button.
- Again, when you are finished recording, tap on the red bar at the top of the screen. Either way, you can access the control panel to stop screen recording.
By default, the iPhone saves the screen recordings to the “Photos” app, from which you can easily access them and edit or share them with friends
Read Also: Apple iPhone 15 Review: Everything You Need To Know
Alternate methods
Go to your phone. “Settings” “General” “About” Check “Available” capacity on your phone. This lets you know how much you can record.
Go to your phone’s “Settings” > “Control Center” > “+ Screen Recording” to turn on screen recording.
How Long Can You Screen Record on iPhone?
Depending on your device’s storage and battery life, you can screen record for three hours continuously.
However, longer recordings take up more space and affect the device’s performance negatively.
This may result in a faster battery drain. Be sure your phone’s battery is completely charged if you intend to record for a longer duration.
However, the default quality of screen recording varies depending on the screen size and operating system version. The quality also impacts the video size
Important note: You can upload videos and images to iCloud and then delete them from your iPhone to make more room for screen recording.
Tips on managing screen recording videos
- Go to the Photos app for editing and shortening video lengths.
- You can relocate or access your videos using the Files app. After relocating, you can either trim or delete these.
- Also, check for duplicate videos and images to save your phone space.