Do you want to learn how to screen record on laptop? Then, proceed to these straightforward methods, whether you’re a professional needing to capture presentations or a software developer creating instructional videos. Both Windows and macOS offer built-in tools for screen recording.
In this article, we’ll go through the methods on how to screen record on laptop, Covering steps for both Windows-based laptops and any recent Mac notebook laptops.
Table of Contents
How To Screen Record On Windows Laptop? What Are The Methods.
There are Two Methods on how to screen record on laptop using either the Snipping Tool or Game Bar. Follow the steps below for a quick and easy screen recording experience.
Method 1: Screen Record On Windows Laptops By Using the Snipping Tool.
While commonly known for taking screenshots, Snipping Tool also functions as an effective screen recording tool, capable of capturing various applications, including File Explorer and the desktop, making it a suitable choice for recording with audio.
Step 1: Search for the Snipping Tool on your Windows device and select it from the results.
Step 2: Click the record button and then press New.
Note: Ensure your Windows apps are updated if the record button is not visible, as this feature was introduced later.
Step 3: Use your mouse to click and drag on the screen, defining the area you want to record.
Step 4: Click Start to initiate the screen recording.
Tip: The control bar includes buttons for toggling the mic and audio recording on and off, even during the recording.
Step 5: If needed, select pause or press stop to conclude the recording. A trash button is available to discard the recording if you wish to start anew.
Step 6: Choose to save and specify the location for storing the MP4 recording, or opt for Edit in Clipchamp to import the screen recording into the Windows 11 video editing tool.
Read Also: Roku Remote Control Not Working? Quick Tips To Troubleshoot
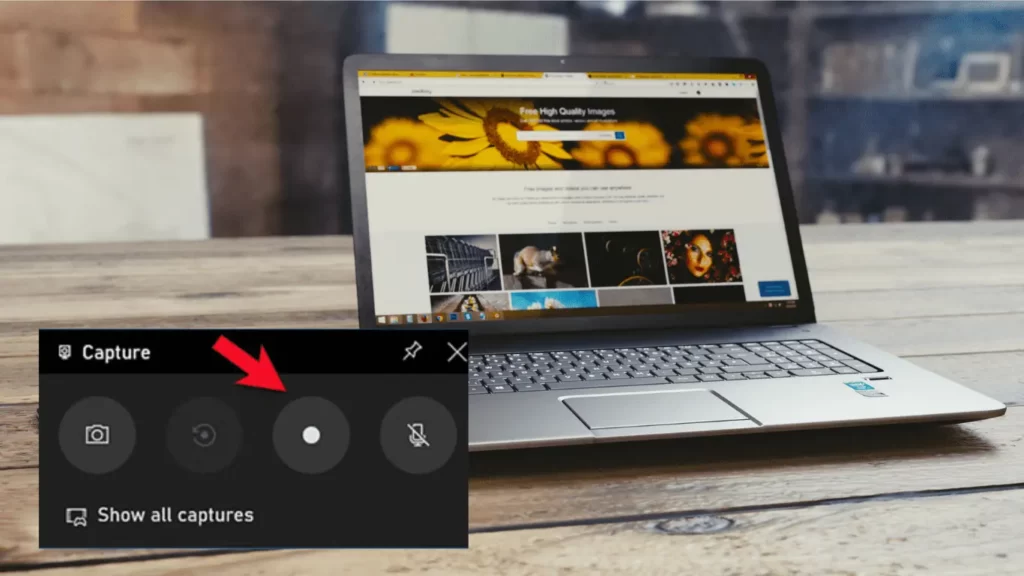
Method 2: Screen Record On Windows Laptops By Using Game Bar.
While the game bar was initially designed for recording video games, it can be employed to capture the activity of any open application.
Notably, it excludes the ability to record File Explorer or the desktop, distinguishing it from the Snipping Tool. To screen record on Windows laptops using Game Bar, follow these steps:
Step 1: Navigate to Settings and click on Gaming.
Step 2: For Windows 10, ensure the toggle switch for recording game clips is enabled on the Xbox Game Bar screen. Windows 11 users can skip this step.
Step 3: Exit Settings and open the app you wish to record.
Step 4: Press Win+G to open the Game Bar.
Step 5: Click on the Capture icon to bring up the Capture widget on the side.
Step 6: Use the microphone icon to enable sound recording or keep it muted for silent captures.
Step 7: Start recording by clicking the Start recording button or using the Win+Alt+R shortcut.
Step 8: A Capture Status widget will show the recording time and Stop Recording button.
Step 9: Click Stop Recording to end the capture. View recordings by selecting Show all captures on the Capture window.
Step 10: The Gallery window displays current and saved recordings. Play or rename files using the Pencil icon.
Step 11: To locate the saved video, choose Open file location. Note that all captures are saved as MP4 files.
Note: Remember that you can customize settings on the Xbox Game Bar and capture screenshots as well.
Read Also: Best AI Tools For SEO Optimization In 2024
What Are The Methods To Screen Record On A Mac Laptop?
You can screen record on your Mac laptop using the Screenshot toolbar. These two methods are available from macOS Mojave onwards or QuickTime Player, which is compatible with all macOS versions.
Method 1: Screen Record On Mac Laptops By Using the Screenshot Toolbar.
Whether you want to record the whole screen or a selected part of the screen with the Screenshot toolbar, follow the steps given below:
Step 1: Open the toolbar and a selection overlay on your screen by pressing Shift+Command+5.
Step 2: After that, opt for “Record Entire Screen” to capture the whole desktop or choose “Record Selected Portion” for a specific area.
Note: Before starting, adjust the selection box’s boundaries by dragging or repositioning it.
Step 3: For additional settings, select Options to access a dropdown menu. Here, customize the save location, enable microphone recording, and set a delay before starting.
Step 4: Press Record to commence the screen recording, and if needed, cancel by pressing the Esc key.
Step 5: To conclude the recording, use the Stop button on the menu bar or the Command+Control+Esc keyboard shortcut.
Step 6: The video thumbnail is displayed in the lower-right corner of the screen, and your next steps depend on your intended use for the recording.
Step 7: To save the recording, swipe the thumbnail to the right. Clicking the thumbnail opens and plays the recording; use the Trim button for editing or select the Share button to share it.
Step 8: Move the recording to another document or location by dragging the thumbnail. For additional options, control-click the thumbnail to access a right-click menu.
That’s all; these steps can help you effortlessly manage recordings by dragging, saving, playing, or sharing through an intuitive interface.
The Screenshot Toolbar provides a user-friendly experience for capturing and handling screen recordings on Mac laptops, which can enhance versatility and convenience in multimedia creation.
Read Also: The Best PS5 Games You Should Play
Method 2: Screen Record On Mac Laptops By Using QuickTime Player.
For macOS Mojave or earlier, you can use QuickTime Player for screen recording. In newer macOS versions, opting for “New Screen Recording” in QuickTime Player opens the Screenshot toolbar.
To screen record on Mac laptops using QuickTime Player, follow the simple steps given below:
Step 1: Start by opening the QuickTime Player from the Applications folder.
Step 2: Go to File > New Screen Recording in the menu bar (or press Control+Command+N).
Step 3: In macOS Mojave or earlier, the Screenshot Toolbar will appear, allowing you to record the entire screen or a selected portion. Use the Options dropdown to adjust settings before recording.
Step 4: Click the Stop button on the menu bar to finish recording. QuickTime Player automatically opens the recording, saving it as a MOV file in the default location (modifiable in Options).
Step 5: Access simple edits by selecting Edit from the menu, where you can, for instance, use Trim to edit your screen recording.
Read Also: What Is Kindle Unlimited? Everything You Need To Know
Conclusion
Through this article we told you how to screen Record on Laptop. Whether you are a Windows user or a Mac user, we have shared methods for both so that you do not face any problems in recording the screen. We hope that this article was helpful to you. If yes, then please share it with your friends also.